Monday, December 31, 2007

A Cool Recipe for Better Skin Tone Colours

Several people emailed me after my previous post enquiring about the skin tone recipe, so here it is. I learnt this in a Lynda.com tutorial by Chris Orwig. It sure has helped me get my skin tones much more accurate.

It sounds like many of you are like me... have a tough time getting good skin tones right. It's amazing how your eye adapts and you pretty easily think that you have good skin tones when in fact you don't.

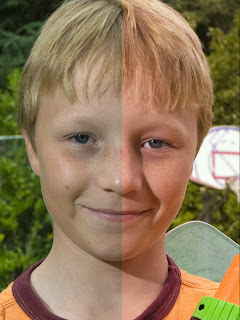
This recipe is not a silver bullet, but it is a great starting point. So here's the image I am going to work on. This image was taken with fill-in flash while standing on a tennis court, so the colours are definitely not right, although at first glance they are not too bad.

As with all the blogs, click on the thumbnails to see full-size images).
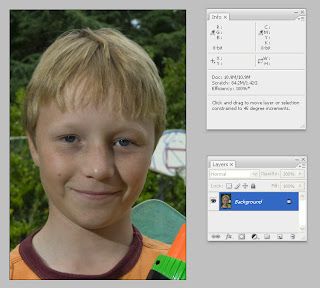
Before I start colour correcting, I am going to just do a simple level correction by adding a levels adjustment layer and bringing back the white level.
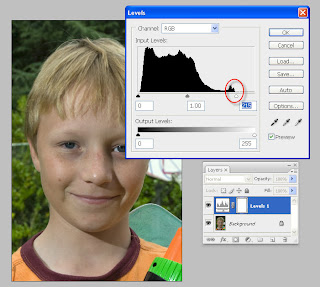

OK, Now this is where we set up to do the measuring for the skin tone recipe. What you want to do is put a "Colour Sampler Measurement" on a diffuse highlight of the skin. See the image below, you can select this tool from the eye dropper menu on the left (choose the middle tool)
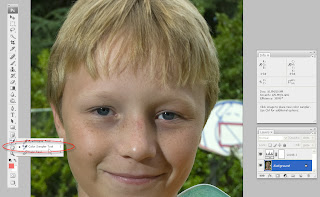

then click on a diffuse highlight of the skin. You should also make sure your sampling size is around 5X5 pixels (see the tool option menu) to make sure it is sampling and averaging a reasonable number of pixels.
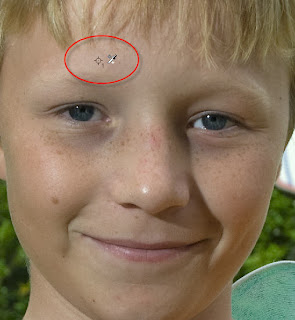

Once you click on a diffuse highlight, you will see the colour sample reading in your info palette.
It normally reads out RGB values by default. However this recipe uses CMYK, so we are going to change the readout to show us CMYK values (Cyan, Magenta, Yellow & Black). To change from RGB to CMYK, click on the little eye-dropper next to your sample readout in the info palette.
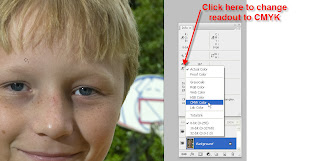

If you have done this correctly, your info palette should look something like this. It is these percentages that we will be focusing on.
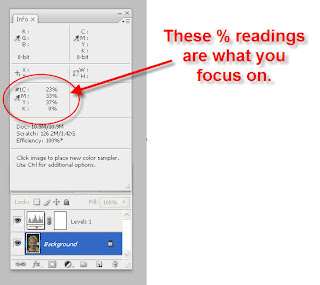

OK, So here's the recipe that I was given for white Caucasian skin... you will need to adapt this as necessary, but it is a good starting point. Write this down.

Cyan Should be a third to a fifth of Magenta

Magenta and Yellow should be almost equal

Yellow should be a little higher than Magenta

blacK should be zero.

Thats it... thats the recipe... now if you look at the readings in our sample they are
C=23%
M=33%
Y=37%
K=0%

So working through the recipe... Cyan should be around one third the value of Magenta, so we need to lower the Cyan as a starting point.

To do this Add a Curves Adjustment layer (we will use curves for adjusting the skin tones). Normally I will do a black and then white balance first using curves (this often does most of the skin tone corrections for me, but to demo this, I am only going to correct the skin tones).
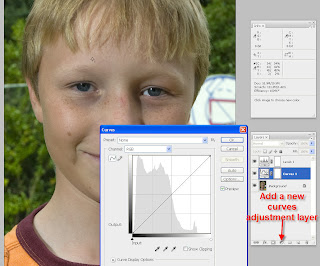

Now that we have the Curves adjustment layer, we need to remove Cyan. Our curves adjustment works with Red, Green & Blue. However fundamtentally
Red also adjusts Cyan
Green also adjust Magenta
Blue also Adjusts Yellow.

So to remove Cyan, I am going to boost the red channel.
From the Curves adjustment layer I am going to change the curve from "RGB" to "Red Channel" (shortcut for this is Cntrl+1). You will see the red histogram appear. Now we are going to put a control point on the red curve that corresponds to the value of the skin tone we are adjusting. To do this automatically, hold down Cntrl and click on the colour sample marker. You will see that Photoshop automatically puts a control point on the red curve that corresponds to the skin luminance level.
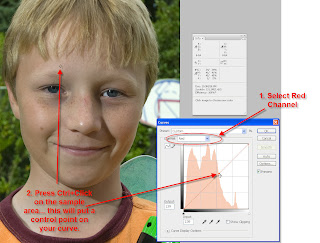

Now if you use your "Up Arrow"key, you will start lifting the red curve (and hence lowering the Cyan values).... Keep moving the curve up until the Cyan values drop to about a third of the Magenta values. Then go to the blue channel, repeat the process (and in this case I had to lower the curve) until my Yellow values were slightly higher than my Magenta (as per the recipe).
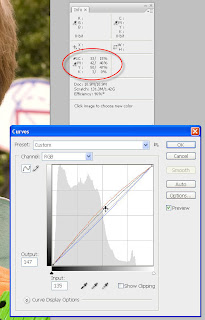

So if you look at the finished adjustments, they now read
C=15%
M=46%
Y=47%
K=0%

So now if you apply the recipe, you will see it fits....
  • Cyan should be a third to a fifth of magenta (15% is around a third of 46%)
  • Magenta and Yellow should be almost equal (46% is almost equal to 47%)
  • Yellow should be a little higher than Magenta (47% is a little higher than 46%)
  • Black Should be Zero (which it is).
The image below shows you a before (left) and after (right) shot. What I always find amazing after correcting the colour is how bad the original actually looked (but i wasn't aware of it). Your eyes have something called local colour adaptation (from memory) which means if you brain knows what the colours are (like skin tones or white), then the your brain will will "see" those colours (even if they are not right).


I have found this "recipe" really helps me get my skin tones in the right ballpark... and then it is pretty easy to fine tune it from here.

Happy New Year.

Friday, December 28, 2007

Xmas Portraits

OK... Wife wanted pictures of the kids this Xmas... about time I stopped taking pictures of the sea and took some of the family.... OK OK... I guess I better have a go at turning out some half-decent portraits.

I decided to stay away from the typical Xmas portrait and instead take some more radical shots of the kids doing what kids do best... playing.

Here's the first in a series of 3 portraits. Middle son Tim who got a skateboard for Xmas.

Tim Skateboarding Portrait

Here's how I shot this.

The Capture:

Put him in the sun which was lighting him from the back (see shadows on the ground in background).

I sat on the ground with my 12-24mm lens... set at 12mm. My other son held my Nikon SB600 flash that was connected by a cable... He was about 1 foot to my left (almost opposite the sun).

Tim did a few jumps and it wasn't too hard to capture him in mid flight. I wanted the flash to punch in very hard and very low... I wasn't after a soft portrait.

The Processing:

I did a dual conversion (one for clouds and one for Tim)


and then blended the two images together (in much the same way as I did the Martian rock processing described in detail earlier.


I colour corrected for the blue of the flash using curves (I found a really cool "recipe" for colour balancing skin tones... works like a treat). If anyone is interested, drop me a note and maybe I'll post the recipe here.


Then I merged the visible layers into a new composite layer (create new layer) then highlight this layer and "Merge Visible" Ctrl+Shift+Alt+E


Then I did a Bleach bypass effect to create the edgy look. To create this effect, the first step is to do a black and white conversion and put this b&w image on the top of layer stack. Use whatever B&W conversion method you prefer. I used Alien Skin Exposure.


Then change the blend mode of this B&W layer to overlay.... It will make the image look very edgy. You can then use the opacity slider to reduce the amount of this effect. I also used a bit of masking to reduce the effect from some of the corners (it was darkening them too much).


After that I duplicated the layer and blurred it using Gaussian Blur and then used a mask to only apply the blur to the background. I used a Gaussian Blur setting of 5 pixels. This blurring of the background further separates Tim from the background.


Final step was to apply a concrete texture to the blurred background. I went to this very cool free texture site and chose a concrete texture that I liked. Added the texture in as a new layer and then used the free transform function to stretch it to fit my picture (they are a bit small in their original form).


Once the texture is added I just changed the layer blend mode to "overlay", apply a mask and paint with a black brush to reduce the texture on his face, arms and legs and then reduced the opacity slider on the concrete layer until the effect is not too strong.


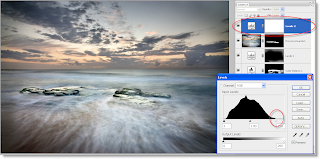
I then created some dramatic vignetting by adding a levels adjustment layer and dragging the mid-point slider to the right (so that it read a value of 50).

This makes your whole image look like crap, so to fix this invert your mask (Ctrl+I) now your mask is all black and you can just paint with white on your mask where you would like your vignette effects to appear.


Final step was to apply some sharpening (I use Nik Sharpener).


Stay tuned for portrait number 2... Eldest son Ben playing Guitar Hero III.

Sunday, December 16, 2007

Post Processing The Martian Rocks

I had a number of people send thank you emails regarding some of my earlier tutorials on how I processed my images. The funny thing is that when I created this blog, to be honest I didn't even think anybody else would find it or be interested in it, it was more of an online diary of how my own techniques have evolved over time. However I am glad that others find some of these tutorials useful.

I thought I would do another end-to-end tutorial showing in detial how I produced my Martian Rocks image Below (click on any of the thumbnails below to see the full sized originals).

Spoon Bay Martian Rocks

This image was not a composite, but produced from one RAW capture. Here's the original RAW capture (my starting point).


While doing the original RAW conversion I was focusing on the foreground only, trying to get as much detail and quality out of the rocks. When I looked at the image above, while happy with the foreground, the sky was nowhere near as overcast or foreboding as I remember it, so I did a second RAW conversion of the same image where I focused on the sky and tried to re-create what it felt like when I shot the image.

Here's the second conversion of the original capture.


After bringing both of these images into Photoshop, I applied RAW pre-sharpening (using Nik Sharpener... the reason I use Nik Sharpener is because I don't want to muck about with Unsharp mask and learn the arcane art of sharpening, in my opinion Nik does a fantastic job of input sharpening and a kick-arse job of output sharpening).

I blended these images together using a simple mask that I created with my wacom tablet in about 20sec (if you don't use a tablet... get one now if you are doing ANY selective processing work at all).

Once I had my blended image, I made a composite layer which was essentially my new background layer (to do this, click the "new layer" icon in the bottom right of the layers pallete, and then press CTRL+SHIFT+ALT+E (don't know the Mac equivalent)


The image above shows the two original layers at the bottom, and then the new compositie layer sitting on top of the stack. Next step I run one of my favorite plug ins Called Alien Skin Exposure. If you haven't played with this plug in, I suggest you check it out and download the 30 day evaluation. It saves me so much time in playing with levels, curves etc.

The image below shows the Alien Skin interface, On the left I have selected the Provia film stock that I like to emulate with my seascape shots. In the main pane you can see my original in the bottom left and the subtle processing that has occured on the image in the top right (I suggest you click on the thumbnail below to view the image large).


The processing that Alien Skin does is pretty subtle, but none-the-less quite nice. The image below shows my image so far (after the Alien Skin processing). You can see that Alien Skin generates a new layer in my layers stack... If I want to tone it down a bit I can simply reduce the opacity of that layer.


Next I did a bit of selective processing to intensify the water. One of the things that really struck me when I was standing at Spoon Bay looking at this scene was the fury and intensity of the water in this little cove. It wasn't coming through in the image, so I used the technique that I described earlier in my blog to make the water a bit more intense. Basically I duplicated the colour film layer (by dragging to the layer icon in the bottom right of the pallette), and then I changed the blend mode of this layer to "multiply". This will impact the entire image, so then added a layer mask (click on the "add layer mask" icon at the bottom of the pallette menu. Once the layer mask has been added it will be all white and you won't see a difference, so I invert the mask (cntrl+ I) now it goes totally black and you lose all the effect. From here just grab a paintbrush (B) and paint on the mask with white wherever you want to intensify the ocean.

I then did a very minor levels tweak because the histogram showed my whites were down a bit.


I also did a slight curves adjustment to brighten my mid-tones slightly


The final effect is to put some vignetting on the image. I will use one of two methods for this depending on the image, either a curve that darkens the image, or in this case I used levels.

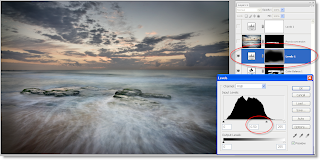
I added a levels adjustment layer and then pulled the mid-tone slider to value of about 50. This makes your image look awful, so I applied a layer mask and inverted it in exactly the same manner as when I intensified the water and then used my tablet to lightly paint white around the edges to create the vignetting.

Final step to output is to duplicate, flatten, convert to sRGB profile, re-size where necessary and then I use Nik Sharpener for my output sharpening.


I hope you found this useful. Here again is the finished image.

Spoon Bay Martian Rocks

Sunday, November 11, 2007

Improving my Photoshop processing of water

I have found a technique through experimentation that I quite like for giving shots of moving water some extra "oompph".


Sunrise at North Turrimetta

I used it to create the above photo.


Here's what the water looked like before I applied the effect


... and here's what it looked like after the effect.


Here's how I did the effect.

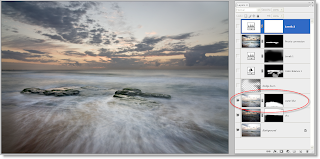
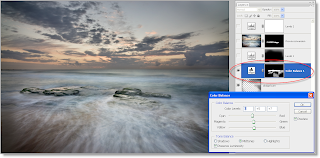
1) Add a colour balance adjustment layer
2) Add some blue and green into the midtones of the colour balance adjustment
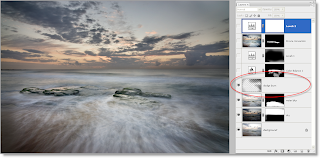
3) Change the blend mode of the colour balance adjustment layer to "multiply"
4) Invert your mask so it is all black
5) Use a white brush to pain on the mask where you want to add drama to the water
6) Reduce opacity if required.

Sunday, November 4, 2007

One Of My Best Shots Yet..Sculpture By The Sea

This morning I picked up the Old Man at 4:45am and we drove down to Bondi for sunrise shoot at Sculpture by the sea. Last year we were lucky and had a glorious red sunrise, so we weren't as optimistic for this year... especially as the weather forecast was for rain.

It would have been easy to ignore the alarm clock at 4:15AM, but I really wanted to get up and out. After picking up Dad it rained all the way to Bondi, but there were some patches of clear sky, so I was optimistic. Anyway... our persistence paid off and the rain stopped the moment we arrived and we were greeted by an incredibly dramatic sky.

This incredible stormy sky proved to be a great backdrop for some lovely images.
Shell and Bridge at Dawn

This is one of my favorite shots that I have shot... I love the mood of this image and the subtle tones of the sculpture against the dramatic backlit sky. I processed this as an HDR image using Photomatix (0ev, +2ev, -3ev). Then ran it through Photoshop, Alienskin Exposure and some final curves and dodge & burn. Very happy with the way this turned out.... I have a 16"X20" print in my hallway now.

I also like this image because of the simplicity of the subject and colours against the stormy sky.

Blue Sculpture

My third shot from the outing was of the sculpture at the top of the headland.

I can feel a storm coming on

All in all, it was a very enjoyable morning of photography. Very happy with the results.

Tuesday, October 30, 2007

Coming Out of The Closet

OK.... I have a confession to make... I bought a macro lens and made my first macro image. Now I'm not sure why I have this mental stigma about macro photographers. I think it's because I've always considered myself a serious landscape photographer and shooting pictures of flowers and butterflies seems like "sissy photography".

It's so opposite to landscape work...
  • Landscape is all about the location
  • Macro is all about the subject
  • Landscape is all about foreground interest and leading lines into the picture
  • Macro is about putting the subject on a very narrow focal plane
  • Landscape is about dramatic low angle light
  • Macro is about diffuse even light to pick up detail.
  • Landscape often has infinite depth of field.
  • Macro often has infinitesimal depth of field.
  • Landscape is about exposure bracketing
  • Macro is about focus bracketing

I could go on and on, but I think we all get it... This is different. So why am I drawn to macro?

Because I think it will be fun to have total control over your shooting... Kind of like a minature studio where I have full control over composition, lighting... everything. I don't have to hope for a great sunrise.... I create my own through colour backgrounds.

So here's my first crack at a macro shot.

My First Macro

I was very happy with the way it came out and it has really energised me to do more quickly. I can't say the concept was original, I came across some incredible photos from Lord V and Steve Took It on Flickr with lots of links to great tutorials on how they created the refracted images of flowers.

So where to from here.... I want to see if I can bring some drama and landscape principles to the Macro world.... Should be quite challenging when I can't even get a bloody leaf totally in focus... but we'll see.

Stay tuned.

Saturday, October 13, 2007

Right Place... Right Time.

Had some interesting photographic outings recently. Went away with the family to Surfers Paradise so the kids could do the theme park thing. I have forgotten how much I hate Surfers Paradise!!!

Decided to do a few sunrises to keep my sanity and get out of the built up area. While doing some research on Flickr I came across some great photos by a guy called Garry. He had some great photos from around QLD, so I dropped him a note to see if he had any recommendations.

Well as fate would have it, he was heading out that weekend to a location not far from where I was staying, so I joined him and his buddy. We went to Fingal Head which was fantastic. I got a couple of good shots.


Garry at Sunrise

My Shift Is Nearly Over...

Enjoyed meeting Garry and his buddy Rafski. Really shows to me the power of the Flickr community in enhancing your photographic outings. I would never have found this headland without Garry.

The second interesting outing was last Friday.... I just returned from vacation and Oat (aka Hangingpixels) invited me along for a shoot on Friday morning with Tom Hide. I decided to go along as I had been getting up early for sunrise shooting anyway. I checked the weather and the forecast was for a thunderstorm on Friday AM, so I thought that sounded promising.

I got there at 4:15am and it was still dark, but I could see a big cloud mass coming in from the ocean rapidly. I thought I was going to get dumped on big time. After taking a few shots, I thought that the day was going to be a waste because the clouds came in as one big overcast mass which made shooting pretty boring.

I actually packed up my gear and started walking back to the car when I ran into Tom arriving late. So I thought I better be social and I turned around and did some more shooting. Almost immediately the skies started changing and clearing and I witnessed one of the most dramatic sunrise skies I have ever seen. Here's a couple of shots from the morning.... I have not enhanced the sky much at all, but check it out.


Tom Does Sunrise... While Oat Sleeps In
This is Tom shooting at Turimetta beach with the dramatic sky.

Here's a shot that Tom took of me a moment later (note the different approach to processing)


Unfortunately Oat must have slept in.... Really goes to show that you have to be out there shooting and sooner or later you get the great light and the great skies. You won't get any great shots being in bed.

On a different note, have decided to spring for a macro lens. I've got some ideas on a new style of macro photography that I want to experiment with.

Watch this space.

Saturday, September 22, 2007

Painting with Waves... An Experiment

I had a brainwave during the week about a new technique I thought of. A while ago I read with interest about a technique called painting with light. Basically if you have a partially cloudy day, you take a picture of an image under cloud, then without moving the camera you take another image in full sunlight. Then later in photoshop you can use masks to "Paint in the sunlight" in the areas you want.

Anyway... I thought "Why not do that with waves"! So here's my first crack at it. Step by Step. Here's the finished that I will be building.

Water Painting # 1

How Did I Do This?
The sequence below shows you the detailed steps to complete the final image. If you click on the small images, you will be see the full-size screen capture.

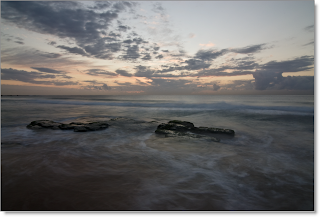
The finished image is actually a composite of 3 images. First I selected my base image. I looked for one that had a pretty good ocean texture all over.


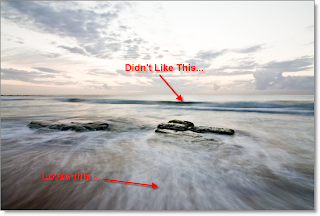
Then I looked through some of the other shots that I took from the same camera position and I found the shot below quite interesting. I really loved the foreground wave blurring and motion, but I didn't like the big wave that was distracting in the background.


The third image in my composite was a bracketed image taken at -2ev which correctly exposed the sky.


So I did a RAW conversion on all three images, and opened them in Photoshop, applied a RAW pre-sharpen to the images (using Nik Sharpener's raw pre-sharpen setting).

The first thing I set about working on was to blend in the new sky. I layered it on top of the base image and used my tablet to paint over the sky.... I must prefer making masks with a tablet because you don't have to be overly precise and with the pressure sensitivity of a tablet you can blend the images pretty seamlessly. Before I bought the tablet I used to spend hours trying to get masks right.. now it's literally a couple of minutes.


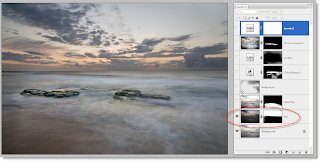
The next step (below) shows the "Painting with water), I overlayed the lovely blurred water image and created a new mask... and inverted it so that it was totally black... then I used my tablet to paint in the new blurred water... If I go to far I just paint with black on the mask to hide it again.


The next step is some dodging and burning. I like to use the soft-light method for doding and burning because it is non-destructive. Simply add a new layer, change the blend mode to soft light and then paint with black to burn and white to dodge..... pretty simple.


After that I applied a very subtle colour balance to the water (using a tablet-created mask) to make the water slightly aqua in appearance.


I then applied a vignette... I do this different ways depending on the image, but for this one I used the levels.... I applied a level adjustment layer and then grabbed the grey slider and moved it over to the right until the value was 50. Then I invert the mask (so that it is black) and use my table to paint in the vignette effect... if it is too strong I use opacity slider to back it off.


I wanted the rocks to have a bit more punch, so I used Alien Skin Exposure and did a Provia conversion (if you haven't used Alien Skin, check out the free eval... I love this product) and just applied it to the rocks to give them a bit more kick (I wanted to leave the ocean to be very subtle and not work it too much).


A small final level adjustment to bring up the white levels.


Finally I do a standard preparation for the web...
Duplicate & Flatten
Resize (to about 12oo px wide)
Convert to 8 bit
Convert to sRGB profile
Apply final sharpenting (I use Nik Sharpener - display mode).
Save as JPG.

Happy painting with waves!!!!