Sunday, November 9, 2008

Pre-flight checklist

Ever been or near the cockpit when a pilot is ready to take off or land? Doesn't matter whether they are a professional or amateur pilot, they all do the same thing... their pre-takeoff or pre-landing checklist. Doesn't matter whether they have flown thousands of flights, they still do it to make sure they don't forget something silly.

So have any of you hot-shots done any of the following by accident?
  • Shot on high ISO
  • Shot JPEG instead of RAW
  • Left your exposure compensation with a bias from your last shoot
  • Left your light metering on the wrong setting (like spot meter)
  • Forgot to clean your lens (and found later a big fingerprint or dirt splodge on it)

Yeah... made all of these mistakes, so I have developed a "pre-flight check" that I now do relegiously at the start of every shoot. I recommend that you do something similar and it will helpfully stop you making silly mistakes. Here's how my pre-flight check works.

Step 1) Set the camera shooting modes and custom mode first (I have settings for "Normal" and "Landscape Mode"). You must do this first because otherwise all your settings will change if you do it later.... ie. You could do your pre-flight check, and then change your shoot mode and everyhing could be mis-set.

Step 2) I go across the top of my Nikon in sequence
  • Quality = RAW
  • WB = Auto (not that impotant if you are shooting RAW)
  • ISO = 200 (my starting point)
  • Mode = Aperture priority
  • Exposure compensation = 0

Step 3) Then I do the back of my camera
  • Light metering = matrix
  • Focus= centre spot

Step 4) Finally I do the front of my camera
  • Bracketing= off
  • Focus= manual (most of my landscape work is manual focus)
  • Lens = clean and clear of dust.
So I highly recommend that find something that works for you.... and develop your own pre-flight check....I can guarantee that you will have less unpleasant surprises if you make this part of your routine... It only takes 15sec to do.

BP

Wednesday, November 5, 2008

Photoshop Technique - Improving your water

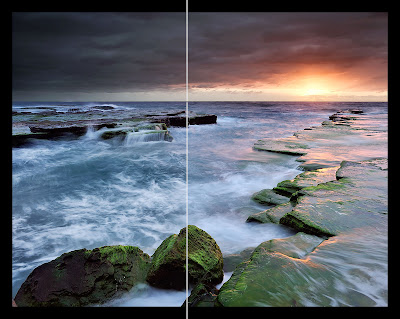
I've written about intensifying your water before, but I have found a better technique that I thought I would share. This really makes your water a lot more dynamic. To show you a before an after effect, have a look at one of my recent shots called "At Last".


On the left you can see the effect of intensifying the water, and on the right you can see the image with all of the post processing except for the water intensifying technique (click on the image above to see the detail)... or you can view the original image at Flickr here.

So how do you do it..... It's actually pretty simple and involves 3 steps

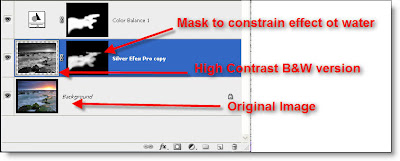
1) Create a new layer with a relatively high contrast B&W version of your image... you can do this using a B&W adjustment layer or your favorite B&W converter... I LOVE Nik Silver Effex.

2) Experiment with the Blend mode... you will want to look at typically overlay, softlight or hardlight blend modes.

3) Once you find one that gives you the "oommph" that you are afterwith the water, Add a layer mask and invert it (cntrl+I on PC) and then paint the effect just over the water.


Thats it... Often on water I will also add a colour balance adjustment layer and add a touch of blue and green to the mid tones and shadows.

I hope you find this useful

Brent

Getting some Traction With Freephotoguides


Well in between family, work, taking photos, processing photos, building light painting rigs, in my spare time I am pretty passionate about the Free photoguides project.

The project is beginning to gain momentum. We now have 16 stunning guides written for NSW alone, and quite a few more being written for other states in Australia.

On top of that UK is is publishing some stunning guides and we are just launching the Swedish site.

I'm pretty proud of the project because if it is successful it will be a great asset to photographers all over the world... The one thing I am not overly impressed with is how much work it is taking to get people to contribute. I have spoken at a number of camera clubs but don't seem to get too many volunteers.. but then there are some weird dynamics about the camera clubs that I don't think are overly healthy.

So if you stumble across my blog and find that a any of the tips, tricks, photoshop techniques are useful for you. The one way you can say thank you to me for my time and effort is to volunteer to write a photo guide for one of your local areas..... 30 min of your time max... and it's a lot of fun.

To find out more about this project go to http://freephotoguides.com

Contributing is easy... come on and support this project.

Brent