Tuesday, October 30, 2007

Coming Out of The Closet

OK.... I have a confession to make... I bought a macro lens and made my first macro image. Now I'm not sure why I have this mental stigma about macro photographers. I think it's because I've always considered myself a serious landscape photographer and shooting pictures of flowers and butterflies seems like "sissy photography".

It's so opposite to landscape work...
  • Landscape is all about the location
  • Macro is all about the subject
  • Landscape is all about foreground interest and leading lines into the picture
  • Macro is about putting the subject on a very narrow focal plane
  • Landscape is about dramatic low angle light
  • Macro is about diffuse even light to pick up detail.
  • Landscape often has infinite depth of field.
  • Macro often has infinitesimal depth of field.
  • Landscape is about exposure bracketing
  • Macro is about focus bracketing

I could go on and on, but I think we all get it... This is different. So why am I drawn to macro?

Because I think it will be fun to have total control over your shooting... Kind of like a minature studio where I have full control over composition, lighting... everything. I don't have to hope for a great sunrise.... I create my own through colour backgrounds.

So here's my first crack at a macro shot.

My First Macro

I was very happy with the way it came out and it has really energised me to do more quickly. I can't say the concept was original, I came across some incredible photos from Lord V and Steve Took It on Flickr with lots of links to great tutorials on how they created the refracted images of flowers.

So where to from here.... I want to see if I can bring some drama and landscape principles to the Macro world.... Should be quite challenging when I can't even get a bloody leaf totally in focus... but we'll see.

Stay tuned.

Saturday, October 13, 2007

Right Place... Right Time.

Had some interesting photographic outings recently. Went away with the family to Surfers Paradise so the kids could do the theme park thing. I have forgotten how much I hate Surfers Paradise!!!

Decided to do a few sunrises to keep my sanity and get out of the built up area. While doing some research on Flickr I came across some great photos by a guy called Garry. He had some great photos from around QLD, so I dropped him a note to see if he had any recommendations.

Well as fate would have it, he was heading out that weekend to a location not far from where I was staying, so I joined him and his buddy. We went to Fingal Head which was fantastic. I got a couple of good shots.


Garry at Sunrise

My Shift Is Nearly Over...

Enjoyed meeting Garry and his buddy Rafski. Really shows to me the power of the Flickr community in enhancing your photographic outings. I would never have found this headland without Garry.

The second interesting outing was last Friday.... I just returned from vacation and Oat (aka Hangingpixels) invited me along for a shoot on Friday morning with Tom Hide. I decided to go along as I had been getting up early for sunrise shooting anyway. I checked the weather and the forecast was for a thunderstorm on Friday AM, so I thought that sounded promising.

I got there at 4:15am and it was still dark, but I could see a big cloud mass coming in from the ocean rapidly. I thought I was going to get dumped on big time. After taking a few shots, I thought that the day was going to be a waste because the clouds came in as one big overcast mass which made shooting pretty boring.

I actually packed up my gear and started walking back to the car when I ran into Tom arriving late. So I thought I better be social and I turned around and did some more shooting. Almost immediately the skies started changing and clearing and I witnessed one of the most dramatic sunrise skies I have ever seen. Here's a couple of shots from the morning.... I have not enhanced the sky much at all, but check it out.


Tom Does Sunrise... While Oat Sleeps In
This is Tom shooting at Turimetta beach with the dramatic sky.

Here's a shot that Tom took of me a moment later (note the different approach to processing)


Unfortunately Oat must have slept in.... Really goes to show that you have to be out there shooting and sooner or later you get the great light and the great skies. You won't get any great shots being in bed.

On a different note, have decided to spring for a macro lens. I've got some ideas on a new style of macro photography that I want to experiment with.

Watch this space.

Saturday, September 22, 2007

Painting with Waves... An Experiment

I had a brainwave during the week about a new technique I thought of. A while ago I read with interest about a technique called painting with light. Basically if you have a partially cloudy day, you take a picture of an image under cloud, then without moving the camera you take another image in full sunlight. Then later in photoshop you can use masks to "Paint in the sunlight" in the areas you want.

Anyway... I thought "Why not do that with waves"! So here's my first crack at it. Step by Step. Here's the finished that I will be building.

Water Painting # 1

How Did I Do This?
The sequence below shows you the detailed steps to complete the final image. If you click on the small images, you will be see the full-size screen capture.

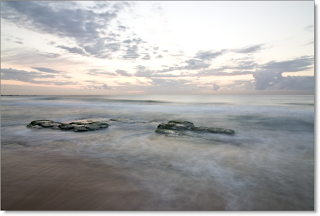
The finished image is actually a composite of 3 images. First I selected my base image. I looked for one that had a pretty good ocean texture all over.


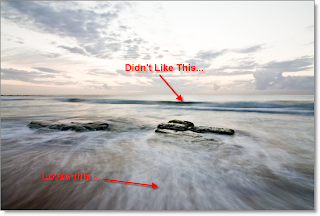
Then I looked through some of the other shots that I took from the same camera position and I found the shot below quite interesting. I really loved the foreground wave blurring and motion, but I didn't like the big wave that was distracting in the background.

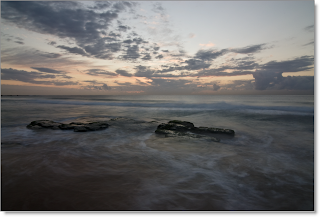
The third image in my composite was a bracketed image taken at -2ev which correctly exposed the sky.

So I did a RAW conversion on all three images, and opened them in Photoshop, applied a RAW pre-sharpen to the images (using Nik Sharpener's raw pre-sharpen setting).

The first thing I set about working on was to blend in the new sky. I layered it on top of the base image and used my tablet to paint over the sky.... I must prefer making masks with a tablet because you don't have to be overly precise and with the pressure sensitivity of a tablet you can blend the images pretty seamlessly. Before I bought the tablet I used to spend hours trying to get masks right.. now it's literally a couple of minutes.
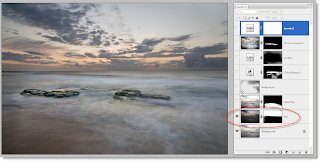


The next step (below) shows the "Painting with water), I overlayed the lovely blurred water image and created a new mask... and inverted it so that it was totally black... then I used my tablet to paint in the new blurred water... If I go to far I just paint with black on the mask to hide it again.
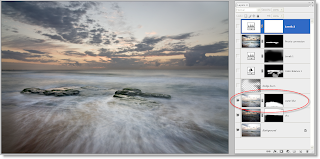


The next step is some dodging and burning. I like to use the soft-light method for doding and burning because it is non-destructive. Simply add a new layer, change the blend mode to soft light and then paint with black to burn and white to dodge..... pretty simple.
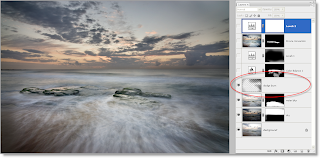


After that I applied a very subtle colour balance to the water (using a tablet-created mask) to make the water slightly aqua in appearance.
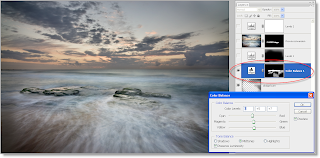

I then applied a vignette... I do this different ways depending on the image, but for this one I used the levels.... I applied a level adjustment layer and then grabbed the grey slider and moved it over to the right until the value was 50. Then I invert the mask (so that it is black) and use my table to paint in the vignette effect... if it is too strong I use opacity slider to back it off.
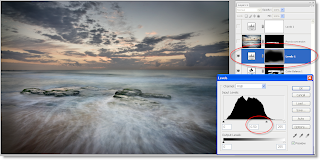

I wanted the rocks to have a bit more punch, so I used Alien Skin Exposure and did a Provia conversion (if you haven't used Alien Skin, check out the free eval... I love this product) and just applied it to the rocks to give them a bit more kick (I wanted to leave the ocean to be very subtle and not work it too much).
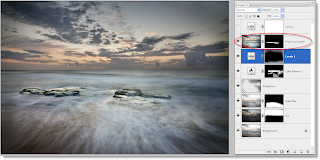

A small final level adjustment to bring up the white levels.
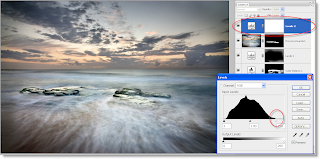

Finally I do a standard preparation for the web...
Duplicate & Flatten
Resize (to about 12oo px wide)
Convert to 8 bit
Convert to sRGB profile
Apply final sharpenting (I use Nik Sharpener - display mode).
Save as JPG.

Happy painting with waves!!!!