Saturday, September 22, 2007

Painting with Waves... An Experiment

I had a brainwave during the week about a new technique I thought of. A while ago I read with interest about a technique called painting with light. Basically if you have a partially cloudy day, you take a picture of an image under cloud, then without moving the camera you take another image in full sunlight. Then later in photoshop you can use masks to "Paint in the sunlight" in the areas you want.

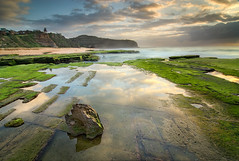
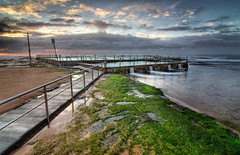
Anyway... I thought "Why not do that with waves"! So here's my first crack at it. Step by Step. Here's the finished that I will be building.

Water Painting # 1

How Did I Do This?
The sequence below shows you the detailed steps to complete the final image. If you click on the small images, you will be see the full-size screen capture.

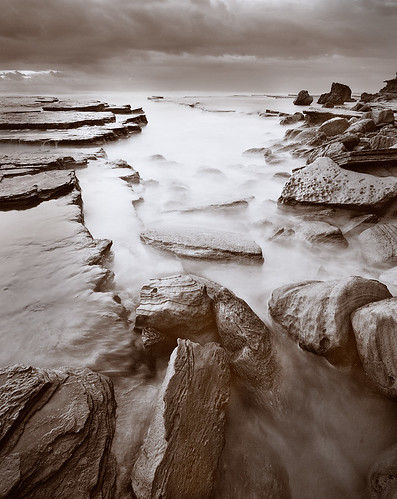
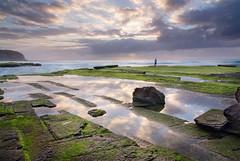
The finished image is actually a composite of 3 images. First I selected my base image. I looked for one that had a pretty good ocean texture all over.


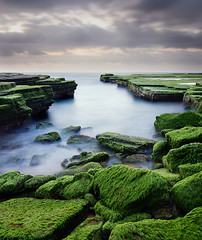
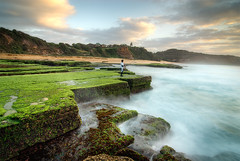
Then I looked through some of the other shots that I took from the same camera position and I found the shot below quite interesting. I really loved the foreground wave blurring and motion, but I didn't like the big wave that was distracting in the background.


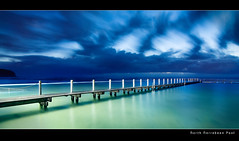
The third image in my composite was a bracketed image taken at -2ev which correctly exposed the sky.


So I did a RAW conversion on all three images, and opened them in Photoshop, applied a RAW pre-sharpen to the images (using Nik Sharpener's raw pre-sharpen setting).

The first thing I set about working on was to blend in the new sky. I layered it on top of the base image and used my tablet to paint over the sky.... I must prefer making masks with a tablet because you don't have to be overly precise and with the pressure sensitivity of a tablet you can blend the images pretty seamlessly. Before I bought the tablet I used to spend hours trying to get masks right.. now it's literally a couple of minutes.


The next step (below) shows the "Painting with water), I overlayed the lovely blurred water image and created a new mask... and inverted it so that it was totally black... then I used my tablet to paint in the new blurred water... If I go to far I just paint with black on the mask to hide it again.


The next step is some dodging and burning. I like to use the soft-light method for doding and burning because it is non-destructive. Simply add a new layer, change the blend mode to soft light and then paint with black to burn and white to dodge..... pretty simple.


After that I applied a very subtle colour balance to the water (using a tablet-created mask) to make the water slightly aqua in appearance.


I then applied a vignette... I do this different ways depending on the image, but for this one I used the levels.... I applied a level adjustment layer and then grabbed the grey slider and moved it over to the right until the value was 50. Then I invert the mask (so that it is black) and use my table to paint in the vignette effect... if it is too strong I use opacity slider to back it off.


I wanted the rocks to have a bit more punch, so I used Alien Skin Exposure and did a Provia conversion (if you haven't used Alien Skin, check out the free eval... I love this product) and just applied it to the rocks to give them a bit more kick (I wanted to leave the ocean to be very subtle and not work it too much).


A small final level adjustment to bring up the white levels.


Finally I do a standard preparation for the web...
Duplicate & Flatten
Resize (to about 12oo px wide)
Convert to 8 bit
Convert to sRGB profile
Apply final sharpenting (I use Nik Sharpener - display mode).
Save as JPG.

Happy painting with waves!!!!

Sunday, September 9, 2007

New Project - Ghost Series

I had a great long weekend of photography. Got out every morning... Friday to North Narrabeen pool, Saturday to Turimetta at high tide and this morning to Mona Vale pool.

During my pre-dawn session yesterday at Turimetta I captured a couple of very interesting long exposure images of the ocean breaking against the rocks. I found the images quite intriguing due to their ghostly appearance, however whenever I tried to create an image, it just wasn't working for me.

I finally decided to have one more go and this time to convert to black and white or a subtle toned print. This has led me to create the first two images of what I hope will be a portfolio of "ghost images".


Ghost Cove
Ghost Cove


Ghost Cove # 2
Ghost Cove # 2

I am enjoying the long exposure photography, I hope this will be the start of some entirely new and interesting images.

Friday, September 7, 2007

Processing North Narrabeen Pool

In this post, I am going to describe my post processing to create this image

North Narrabeen Rock Pool Before Dawn

The two starting images. I chose two exposures of the scene. One of them was reasonably exposed for the path and water (highlights did blow out a bit on the poles). The second image was a much longer 3 min exposure for the sky (click on thumbnails for closeup of screen shots).


Colour balancing these in RAW was interesting. I knew that the camera wouldn't get this right because there are some pretty funky sodium lights illuminating the pool. When combined with the pre-dawn blue hour, it was always going to be tricky. This is what I love about shooting RAW, I can sort out white balance later and not worry about camera settings.

This is the image as it appeared originally in ACR (Colour balance settings left to default)


Here's how it looked when I corrected the colour (pretty different eh?)

Once I got it into Photoshop, I applied pre-sharpening (courtesy of Nik Sharpener Pro 2.0) I then cropped and extended canvas to create black background for panoramic format.


Next I did a colour balance to get the water colour to be a bit more blue/green in colour. I wasn't worried about the sky because I was going to replace it with the long exposure sky anyway. I was sampling colours from the white posts to ensure colour neutrality in the shade of the white posts. Here's what it looked like as I colour balanced.


Once I colour balanced it, I then did a simple levels adjustment. To bring in the sky from my other exposure I just laid it on top and used my tablet to create a pretty quick and simple mask. Here's what the composite image was looking like.


Next I ran my image through Alien Skin Exposure (I love this program, it emulates the look of film, if you haven't tried it, there is a free 30 day eval.)... I chose Fuji Provia 100 as my desired film look. You can see the original on the left part of the screen, and then the preview of the film effect on the right. With the provia setting it is pretty subtle, but it does give the image some pop..... If you choose something like Fuji Velvia then it is much more dramatic.


Final step was to do a bit of dodge and burn and then darken corners using curves, then resize, convert to sRGB, output sharpen via Nik Sharpener.

Wednesday, September 5, 2007

Turrimetta

Last weekend I had a wonderful shoot down at Turrimetta. What a gorgeous place. It's funny to think that I grew up in Sydney on the North Shore but never visited this jewel.

Dad and I went out to Long Reef on Saturday for a dawn shoot, but in true Long Reef style, the sky was very boring. On the way back we stopped at Turimetta to check it out. It was gorgeous and I just had to go back the next day.

Got there really early and shot this photo

Green Weed Cove

This was actually shot about 30 min before sunrise, it was pretty dark and I was wrestling with the correct exposure. This one was about a 2min exposure and I then blended in another exposure of the sky @ -2ev. Didn't use HDR on this photo as besides the sky, the rest of the image had a moderate dynamic range and I didn't want to compress it.

With some of the other shots from Turimetta I have been modifying my processing technique a bit. I usually start with an HDR composite that gives me my base image, and then I start overlaying individual exposures over the top to try to re-capture more of the original tonal ranges...

Turimetta Mirror Pool 1

In the above image I used an HDR base layer, then I replaced the sky with an exposure captured at -1ev and the I replaced some detail in the foreground rock and some of the rock shelf from an exposure taken at +2ev.

Here's a couple more shots from the same morning.

Turimetta Mirror Pool 2

The Fisherman

I might head back out to Turimetta this weekend to check it out at high tide.

Oh.... and the funny thing is that Dad was supposed to join me on Sunday for this shoot but he decided to sleep in instead. It seems that I get my best sunrise shots when he sleeps in....

Monday, September 3, 2007

Life after Southwest USA

After returning from the USA, I didn't pick up my camera for over a month. This was for a couple of reasons.
1) I had 2 intense weeks of incredible shooting in some of the best landscape locations in the world.
2) I wanted to spend time with my family after being away for a couple of weeks
3) I had a lot of images to process
4) I thought that I would be stuck for subjects in Sydney

Well, I'm back into it again, and the last couple of weeks I have taken some photos that I have been really happy with.

Check out these three photos from my shoot at Mona Vale pool last week.

Still Pool in the Storm

This one is a simple composition, but I decided to really try for a more stylistic look through my photoshop processing.

This second one used some pretty aggressive HDR processing, but I really wanted a creative and stylistic (almost surreal) look to this photo.

Red Light and Streaming Water

This last one is an interesting one... I almost didn't bother to process it at all, but it has gotten some very interesting feedback and comments on Flickr and has probably turned into one of my most popular photos.

Seaweed Path to Pool

I'm loving the crazy perspective of my 12mm lens. I love getting right in amongst the scene and creating crazy conversion lines with the ultra-wide lens. Nice and dramatic.