Sunday, November 9, 2008

Pre-flight checklist

Ever been or near the cockpit when a pilot is ready to take off or land? Doesn't matter whether they are a professional or amateur pilot, they all do the same thing... their pre-takeoff or pre-landing checklist. Doesn't matter whether they have flown thousands of flights, they still do it to make sure they don't forget something silly.

So have any of you hot-shots done any of the following by accident?
  • Shot on high ISO
  • Shot JPEG instead of RAW
  • Left your exposure compensation with a bias from your last shoot
  • Left your light metering on the wrong setting (like spot meter)
  • Forgot to clean your lens (and found later a big fingerprint or dirt splodge on it)

Yeah... made all of these mistakes, so I have developed a "pre-flight check" that I now do relegiously at the start of every shoot. I recommend that you do something similar and it will helpfully stop you making silly mistakes. Here's how my pre-flight check works.

Step 1) Set the camera shooting modes and custom mode first (I have settings for "Normal" and "Landscape Mode"). You must do this first because otherwise all your settings will change if you do it later.... ie. You could do your pre-flight check, and then change your shoot mode and everyhing could be mis-set.

Step 2) I go across the top of my Nikon in sequence
  • Quality = RAW
  • WB = Auto (not that impotant if you are shooting RAW)
  • ISO = 200 (my starting point)
  • Mode = Aperture priority
  • Exposure compensation = 0

Step 3) Then I do the back of my camera
  • Light metering = matrix
  • Focus= centre spot

Step 4) Finally I do the front of my camera
  • Bracketing= off
  • Focus= manual (most of my landscape work is manual focus)
  • Lens = clean and clear of dust.
So I highly recommend that find something that works for you.... and develop your own pre-flight check....I can guarantee that you will have less unpleasant surprises if you make this part of your routine... It only takes 15sec to do.

BP

Wednesday, November 5, 2008

Photoshop Technique - Improving your water

I've written about intensifying your water before, but I have found a better technique that I thought I would share. This really makes your water a lot more dynamic. To show you a before an after effect, have a look at one of my recent shots called "At Last".


On the left you can see the effect of intensifying the water, and on the right you can see the image with all of the post processing except for the water intensifying technique (click on the image above to see the detail)... or you can view the original image at Flickr here.

So how do you do it..... It's actually pretty simple and involves 3 steps

1) Create a new layer with a relatively high contrast B&W version of your image... you can do this using a B&W adjustment layer or your favorite B&W converter... I LOVE Nik Silver Effex.

2) Experiment with the Blend mode... you will want to look at typically overlay, softlight or hardlight blend modes.

3) Once you find one that gives you the "oommph" that you are afterwith the water, Add a layer mask and invert it (cntrl+I on PC) and then paint the effect just over the water.


Thats it... Often on water I will also add a colour balance adjustment layer and add a touch of blue and green to the mid tones and shadows.

I hope you find this useful

Brent

Getting some Traction With Freephotoguides


Well in between family, work, taking photos, processing photos, building light painting rigs, in my spare time I am pretty passionate about the Free photoguides project.

The project is beginning to gain momentum. We now have 16 stunning guides written for NSW alone, and quite a few more being written for other states in Australia.

On top of that UK is is publishing some stunning guides and we are just launching the Swedish site.

I'm pretty proud of the project because if it is successful it will be a great asset to photographers all over the world... The one thing I am not overly impressed with is how much work it is taking to get people to contribute. I have spoken at a number of camera clubs but don't seem to get too many volunteers.. but then there are some weird dynamics about the camera clubs that I don't think are overly healthy.

So if you stumble across my blog and find that a any of the tips, tricks, photoshop techniques are useful for you. The one way you can say thank you to me for my time and effort is to volunteer to write a photo guide for one of your local areas..... 30 min of your time max... and it's a lot of fun.

To find out more about this project go to http://freephotoguides.com

Contributing is easy... come on and support this project.

Brent

Wednesday, October 22, 2008

Persistence Definitely Pays Off

Last weekend was Sculpture By the Sea at Bondi. I shot it once at sunrise and once at night.


The sunrise shooting turned into a zoo as 3 camera clubs of photographers decended over the hill and started battling and jockying for position. I packed up my gear and left (I hate shooting in crowds).

Anyway when I compare that to my evening shoot... what a total contrast. I arrived at the exhibit just as the sun was setting, I scouted around as the crowds were starting to disperse, picked the sculpture I wanted to focus on and sat down on a near by chair and just stared at the sculpture thinking about the composition I wanted to create.

As the last light was fading in the sky I set up my gear, tested my lights and started a sequence of long exposures, 1 min, 2 min, 4 min.

Once I had my base image captured, then I reset my camera for60 second captures and started painting the sculpture from slightly different angles, distances, and with different amounts of feathering. I find that it can be hard to judge things like shadow sharpness using the camera LCD screen, so I find it easier to essentially "bracket" my light painting from harder directional light to more softer light (by waving the light around more).

I really liked the mood of this image. Going to go back this weeked and capture one more light painting.... I have a particular sculpture in mind for an awesome star trail shot.

I feel as though after a number of botched outings and lots of experiments, I am really starting to understand the technical fundamentals of good light painting..... at last!

BP

Sunday, September 28, 2008

Light Painting 101

Following on from my posting about Night Photography, this posting is a basic 101 guide for photographers interested in light painting. If you haven't read the primer to night photography, read that first. You really do need to be comfortable with night photography before playing around with light painting.

What is light painting? As you would expect from the name it's basically using light to paint a photographic image. There is actually several quite distinct variations of light painting.

1) Using a light to create trails or writing in the image. Some people like to write words, or trace outlines. Essentially you are exposing the image and leaving trails by moving the light source around in the frame. If you want to see an example of this, check out this link

2) Coloured strobes.
There are some incredible photographers who paint with coloured light. Essentially firing strobes with coloured gels on them to illuminate a scene in puddles of coloured light. Click here to see a good example of this technique.

3) Painting the landscape with more natural light.
This is the type of light painting that personally interests me. Essentially you are using light sources to paint parts of the landscape with man-made light. Here's an example of one of my recent images that involve light painting.


The image involved shooting a background image of the rocks and then blending in individual images of each of the rocks that were illuminated by different light sources.

So what sort of light sources should you use for light painting? Thats where the fun begins. Each light source has different qualities.... colour temperature, harshness, intensity etc.

I'm not going to spoil your fun by telling you what I use... because there is no right or wrong answer.... half the fun of light painting is thinking about what light sources you have and experimening with them... studying their qualities and working out what you like and don't like about each source. Doesn't matter whether it is a torch or a strobe..... I suggest you get ou there... lock your camera open and just start experimenting in your back yard to learn about the light sources before you get out on location.

If you have done some experimentation and want some advice, drop me an email and I'll be happy to look at what you are doing and providing some pointers if required.... but I'm not going to short circuit the experimentation process for you by telling you what light sources I use. I have been experimenting for about 3 months with different light sources.

I have built two light painting rigs and I'm just about to build a 3rd one. Each time I build one I learn a lot about what I need in a light painting source. Get out there and have some fun and see what you can paint.

Brent

2)

Wednesday, September 24, 2008

Night Photography 101

Night Experiments continue

Recently after some of my light painting episodes I have had a few people contact me about night photography and light painting. So I thought I would do a primer on night photography first to help get people into it, and then follow it up with some advice on light painting.

First of all.... Night photography is technically a lot more challenging than shooting during the day for a number of reasons;
1) Hard to focus at night
2) Hard to compose your shot at night
3) Your light meter is useless
4) You can run into some white balance issues.
5) Hard to see your camera controls

So, if you aren't taking pretty good shots during the day, then I would advise that you focus on improving your basic photography during daylight hours first (composition, exposure, understanding your camer etc.)

Cute Pool at night in BW

However if you feel you are ready for photographing at night, then this should help you get started.

What You Need For Night Photography
  • Tripod - Essential
  • Remote shutter release cable - without this you won't be able to take exposures beyond 30sec.
  • Headlamp torch
  • Powerful pocket torch (I like the surefire torches... small, bright and the colour temperature is somewhere around 5000K
  • Pocket exposure guide - See my blog posting on calculating night exposures
Ready to go?
First thing I would recommend reading is all of the blog postings I made in Feb 08 (they all chronicle my exploration of night photography).

Picking a good night.
I would start by choosing a night that has
1) A full moon (or somewhere closer to a full moon)
2) Some clouds in the sky

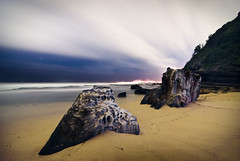
Arrive before sunset. This allows you to scout your location, setup for your first location, get your composition and focus just right and relax. Start taking a few shots and watch the exposures start to get longer and longer as dusk approaches.

Focusing in the dark
To focus I set my lens to manual, shine a bright torch at a point in the image I want to focus on and do my best to set the focus manually... live view is useless and Autofocus is more than likely not going to cut it unless the focal point is close to the camera on and you have some sort of AF assist going on.

Flip over to manual exposure mode. Your light meter won't work in low-light, so you are going to have to shoot on a manual setting.

I would recommend starting on f5.6 aperture. To work out the correct exposure, I recommend you crank up your cameras ISO to either 1600 or 3200 and start with a 30sec exposure. Check your histogram and then adjust your shutter time to get an appropriate exposure (if you don't know how to read a histogram, do some research so that you understand it... it is critical).

Once you have established a correct exposure and checked composition and focus at high ISO, you need to crank back your ISO to something that will give you images with low noise. This will depend upon your camera, but with night photography it is all about long long long shutter times, so even if your camera can handle super high ISO settings with low noise (like my D700), it is still worth dropping it back to something like 200ISO.

You will need to double your shutter duration for each time you halve the ISO. Here's an example....
Lets say you crank up your ISO and determine the exposure is fine when you are shooting at
3200 ISO @ 30sec @ f5.6

When you drop your ISO to 200, you have reduced your exposure by 4 stops
3200 to 1600 = 1 stop
1600 to 800 = 2 stops
800 to 400 = 3 stops
400 to 200 = 4 stops.

So to compensate you will need to increase your shutter speed by 4 stops
30 sec to 1min = 1 stop
1min to 2min = 2 stops
2min to 4min = 3 stops
4min to 8min = 4 stops.

So the correct exposure would be 8min @ ISO 200 @ f5.6

Seen Better Days

Set your camera shutter to bulb, and get your stop watch ready.

Lock your cable release open, and then pour yourself a glass of nice wine, grab some chips or biscuits and sit back, watch the stars and enjoy the evening. One of the joys of night photography is the pace... long exposures mean plenty of time to relax, slow down, talk to other photographers, or just relax. Don't expect to come back with cards full of great images, be happy with one or two from an evening of night photography.

I'll do a primer on Light Painting shortly.

Enjoy.... I'd love to hear your feedback.

Brent

Sunday, September 14, 2008

Light Painting Forresters Rocks

This is a shot that I have been planning for about 6 weeks. I have been doing a lot of research and experimentation on light painting sources.... bought some, made some.... All the while I had a very clear first image in my mind... the gorgeous rocks at Forresters by moonlight.


I had thought about the final image for weeks... literally. I had planned the shot in a fair bit of detail and could have sketched the finished image weeks before I photographed it.

While there was still a fair bit of experimentation with light sources and exposures on the night, there was no doubt about the end result. I was pretty happy with the way that it turned out.

Incidentally, for those that want to understand what this scene looks like without the light painting and post processing... Here's one of my RAW captures straight out of the camera... this should give you an appreciation for the power of light painting when it comes to night photography.

Brent

Sunday, August 17, 2008

Is there such a thing as a Photogasm?

A few days ago I picked up my new camera and lenses... I have made the plunge from a DX sensor to a full frame FX sensor. This meant it was time to say goodbye to my trusty D200 and Old Faithful Tokina lens. They have done me well and I have enjoyed shooting with both of them.

Goodbye D200, Hello D700

However, it seriously can't compare to my new kit. The D700 and two new "Pro" lenses - 24-70 f2.8 and 17-35 f2.8. If there is such a thing as as a Photogasm... I reckon I experienced it when I started shooting with this gorgeous combination.

The camera itself is a dream, from the bright large viewfinder, to the fantastic liveview screen (with electronic horizon and everything).... It's just fantastic. And the clarity of the lenses is just breathtaking.

I absolutely love this new camera.... let the fun begin.

Tuesday, August 12, 2008

Another Open Source Photo Guide

I had some very positive feedback on the Open Source Guide concept... I've just created another one for Forresters beach which is by far the most comprehensive one yet.

Check out The Photographer's guide to Forresters Beach

Let me know what you think.

Brent

Sunday, July 27, 2008

Open Source Free Photographic Guides

Today I was exploring a new location for a landscape shoot. I hadn't seen any decent shots from this location, and in fact I'd never heard of it. I just happened to be cruising around on Google Earth and looking at a few of the Flickr photos that had been geocoded around this particular area. A few happy snaps, but no serious photos.

So today it was a lovely Sunday afternoon, so I took my son and we went exploring to recce this location. Turns out it is a very good location with a lot of potential... I'm going to shoot some dawn shots there next weekend. But on the way back I was thinking to myself... Wouldn't it be cool if there was some sort of central registry where photographers could share their favorite locations with other photographers.

Some sort of Virtual Open Source Photographic Guide... A Wikipedia of Photo Guides.... Guides so rich in great photographic info, that it would help any photographer find great new locations to shoot, and improve their chances of getting great shots the first time by knowing when and where to shoot.

As I was hiking out with my son I was thinking about what it would take to create some sort of tool that others could use.... What would it need?
  • A simple authoring tool (know HTML or any of that stuff)
  • Free hosting (I didn't want to pay for it)
  • A place to upload pictures or link to existing pictures on Flickr
  • A way of allowing others to post comments
  • A search engine so people can find your guides
  • A Comments capability that would allow others to comment (or ideally suggest updates) to guides that you post
  • A Rating system so readers could rate your guides.

That was my initial list. When I got home and reached for my blogging site, I saw an interesting little posting about Google's new capability called Knols (chunks of knowledge)... and guess what... it pretty much perfectly met my criteria.

So I have started an experiment and written two Knols on photographic sites in Sydney that I know pretty well. I'd love to hear what you guys think.
1) A Photographer's guide to Turimetta Beach
2) A Photographer's guide to Mona Vale Pool

Take a moment to have a look at these guides and let me know if they contain the sort of information that you would like to see if you were going to visit a new site.

Imagine if we could get thousands of photogrphers to start documenting their favorite locations and becoming the "local expert".... we would have the largest guide to photographers anywhere in the world!! What a great resource that would be!

Take care... and watch my photostream on Flikr for the cool new site I discovered on Sunday

Brent

Monday, July 14, 2008

Shutter Blending "Splash"

I thought I would share another example of shutter blending. This photo is called "Splash"

Splash

When I saw this rock formation in the water, I totally pre-visualised this image.... I immediately saw three quite separate parts of the image in my mind.

1) A razor sharp foreground clearly showing the detail in the beautiful sand with the water providing lead-in lines to the rock.

2) Long exposure water to remove the distractions from the sea and focus instead on the colour and movement and allow you to concentrate on the gorgeous rocks

3) I was intrigued by the way the ocean was splashing up against the rock in the background, so I wanted to "freeze" a splash in mid air as a contrast to the long expsosed sea.

Executing this was pretty simple, 1/125 sec exposures for top and bottom images, then screw on the 10 stop ND filter for the middle exposure (about 20 sec from memory).

Blending was also pretty simple in Photoshop, couple of minutes with the Wacom tablet and I had some pretty seamless masks.

I'm enjoying the abstract possibilities of Shutter Blending. I'd love to see some examples of others experimenting with this approach

Brent

Saturday, June 14, 2008

Shutter Blending

OK, So most of you have probably heard about exposure blending... blending multiple images of various exposures together to manage the dynamic range in a scene.

Well for a while now I have been thinking a lot about what it is I love about long exposure photography... and it is the contrast of the movement and motion of clouds or water against static items like rocks, or pools.

Luna Park Shutter Blend experiment #1

I've been thinking about how to apply this to non-traditional scenes and I have come up with a technique that I call shutter blending. I'm sure others must be doing this, but I haven't found anyone using this technique.

Intead of blending images of different exposures, what I want to do is blend images of the same exposure, but with vastly different exposure times (shutter speed). I'm doing this through a set of ND filters (3 stop and 10 stop).

What I plan to do is take a series of images of a scene with a fairly high shutter speed until I get a person (or group of people) that I want to make my focal point, and then take quite a few shots of blurred people moving and clouds wizzing past and then blend them all into a composite scene... thats what I'm calling Shutter blending.

If anybody finds examples of others doing this type of photography, I would appreciate the links.

BP

Monday, May 19, 2008

My Night Work Is Starting To Click

Well I have been mucking about with night photography for a few months now.... I feel like I have gone through the initial experimental phase... I now know how to optimise my camera for the conditions and I have got a pretty good feel on how to read the conditions to capture the effects that I want.

Went out last Saturday night and captured this image.

Night Experiments continue

While there were still some technical aspects that I wasn't happy about with this photo, for the first time I felt that I started to capture the image that was in my head... In my mind that is a pretty big milestone.

I have shot this location before at dawn, but focused on the swirling waves.... this time I wanted the focus to be on the sky contrasting with the gorgeous pool sitting in the blur of the ocean.

I pretty much achieved my result..... at last..... shows that it does pay off to stick with it.

Got a few more images in my head that I'd like to take this full moon.... I just wish the damn clouds would play ball.... it's been crystal clear nights the last few.

Incidentally, this image was actually taken at dusk (15 min after sunset), with a 10stop ND filter on. Sure helps with the composition and focus when there is a bit of light around. I stopped down to f11 and almost 5min for this exposure.

BP

Sunday, April 20, 2008

A Night Photography Excursion

Last night my old man, Kajo and I went out for an evening of night photography. This was pretty bullish as it had been raining on and off all day and the forecast was pretty lousy for the evening... but then it beats TV!

We decided to head out and shoot an old abandoned plane that another Flickr member Rob Des had done a nice job of shooting.

The first little problem came when we got out of the car... the ground wasn't just wet, but it was literally a marsh... within 3 steps my shoes were totally sodden.

When we arrived the sky started clearing nicely and we thought we were going to have a great night's shooting. We started shooting this old DC3 and I grabbed this shot before the clouds closed in on us again.

Night Flight


Shortly after this, we had to take shelter from the rain. Luckily the airplane wing provided plenty of cover from the elements.... We killed a bit of time by playing around with some light painting in the interior of the plane.

Once it stopped raining, we went outside and continued shooting, but without any breaks in the cloud, the night shots just looked like day shots. We decided to do some more experimentation with light painting and strobes and while we were learning a lot more about how strong to make our torch light, without scattered clouds in the background the shots just didn't have the punch that we were looking at from night photography. We waited about another 30 minutes discussing everything from the merits of various noise reduction plug-ins to lens recommendations... however finally we called it a night and headed home.


Even though we only got about 20 mins of shooting in ideal conditions, the outing was a lot of fun and pretty educational.

Thursday, April 3, 2008

Putting the creativity back to the camera not photoshop

Lately I've been going "retro" with my photography. I bought a spot meter and a creative filter kit for me camera. It's all part of my deliberate effort to slow my photography down and shoot less shots that are higher quality.

Getting into filters again has been interesting. I decided to go with the ZPro size Cokin filter holder because it allows me to use my ultra-wide lenses without vignetting.

After a fair bit of research I decided to go with the Singh Ray Graduated ND filters which I love! I also decided to buy a Cokin 3 stop ND filter. I figured that even though Cokin are cheap filters I couldn't go too badly wrong with a simple ND filter...... Wrong!

When I started shooting I noticed a kind of candy pink colour cast coming out in my shots (you can see it clearly in the shot below.

The Old Boy Being Swept Away

I was perplexed by the pink sky I was getting but didn't get a chance to diagnose the source. About a week later I was shooting some sunrise shots and I clearly saw the pink cast again come up on the camera LCD, so I did a simple test... I pulled out the Cokin ND and left in the Singh Ray filter. Here's the results...


Cokin's NOT SO Neutral Density Filter

Now whether you like the pink sky or not... the fact is that it SHOULD be neutral (the colour on the right). If I want a coloured sky then I would add a tobacco filter or colour it in post production. But I didn't.

I have taken my Cokin ND back to the shop I bought it from and I am trying to get a refund. I am paying the extra money for Lee ND filters which have come highly recommended.

Moral of the story... You get what you pay for... filters aint filters.

BP

Wednesday, February 27, 2008

Finding The North and South Celestial Pole

I'm sure all of you have seen those cool star trails photos of the stars spinning around a circle. Well that circle is either the North or South Celestial pole.

Now I don't know about you, but my astronomy is not that flash, and when I was out doing some photography the other night, I couldn't work out the axis that the stars rotated around so I could frame my shots.

I decided to do a bit of research to work out how to locate them, and here's the answer.

Enjoy
Brent

Sunday, February 24, 2008

Night Shoot Number 3 - The Old Blast Furnace

Last Saturday my Old Man and I threw our swags into the 4WD and headed up to the mountains for a planned evening of night photography. It was a full moon so we figured the old Blast Furnace at Lithgow would be a great location for some long exposure work.

Got some interesting images.

Architecture Under The Stars


This first one was a 12 minute exposure... my longest yet. I jumped down into the basement of the old gas works and camped out there in the dark to get this image.

We were lucky in the fact that a bunch of clouds finally came overhead to create some drama to this image of the ruins.


The clouds Did Come After All


Starting to feel like I am getting the night photography sussed out... I've got a routine going to calculate exposures and to compose my shots and I seem to be making the captures correctly (hardly any noise and the amp glow hasn't posed a major problem).

I love the pace of night photography... lots of time to think and plan while the shutter is open. My new torch seems to work well, so I'll have to start doing more painting with light.

Brent

Thursday, February 21, 2008

How Do You Calculate Night Exposures?

One of the most frustrating aspects of jumping into night photography was the exposure metering. Forget your handy-dandy in-camera meters, mine will only meter to 30sec and I expect thats pretty much standard.

So how do you work out your exposures? Hand held light meter? I don't think so...

Most hand-held light meters are only sensitive to about -2ev, so thats not going to help you work out your exposures.

Trial and Error - Yup, that works... but here's a way to get close to the right exposure out of the gate.

I came across an interesting article by Fred Parker called "The Ultimate Exposure Computer". If you haven't seen this, it's worth a read. Fred has published some exposure tables that allows you to calculate exposures under any lighting conditions, using any combination of shutter speed, ISO and Aperture.

What I have done is to distill the relevant information into a handy pocket card that allows you to get a pretty good starting point for your exposures. This is what it looks like.

You will see that it "hard-coded" to 200 ISO (because thats what the speed that I'm going to shoot all my night work) and the aperture ranges from f4 to f16 (because I'm unlikely to shoot outside that range).

So just look at what sort of moon you have, and then read off how many minutes you need to expose for at the various f-stops.

If anybody wants this chart in PDF format, just drop me an email, otherwise you can just print this article and cut it out.

Enjoy

Brent

Wednesday, February 20, 2008

Now I'm getting ready for a serious shoot

OK, I've done two weekends of test shoots at Turrimetta and learned some useful techniques. I feel I'm ready for a more serious night shoot.

I just bought a neat little torch from Surefire, these things are very cool. Very small, very bright, rechargable and have a 5000 degree colour temperature, so I shouldn't get any colour casts when I do some light painting.

This weekend The Old Man and I are headed up to an interesting location, we are going to up to the Old Blast Furnace in Lithgow. I went there about a year ago and took some shots like this one.

Old Blast Furnace 4

The conditions look good. Full moon rising 30min after dusk, fine weather (I hope we get some clouds).

Going to shoot sunset, then dusk, then night, then sunrise.

Hopefully I will have some half-decent images to post next week.

Sunday, February 17, 2008

More findings on noise and night shooting.

Went out last night for my second night of night photography. The moon was mostly hidden behind heavy overcast which was frustrating, however I got this shot from the rocks looking back under the moonlight.
Turrimetta Rocks At Night

So a couple of important learnings from my second night out.
Moonlight helps big-time
It looks like I may have been just a tad quick off the mark about the lack of noise reduction. The Long Exposure noise reduction doesn't seem to impact the noise levels in the picture per-se, but Toby and Tim nailed with their comments. It seems the Long Exposure noise reduction doesn't significantly help with overall noise levels, but what it looks like it helps with is "Amp glow".

Check out this shot (you may need to click on it to view it large).

Check out the purple amp glow in the bottom right (very bad) and also in the bottom left.

This shot was a 10min exposure. I went back and looked at my earlier shots to see where it seemed to kick in, and it looks like it kicks in around the 5-6 min mark. Anything under that and I couldn't really notice it, but definitely on the 6 min exposures and 8 min exposures I could see it.

Thursday, February 14, 2008

Very Cool Sun & Moon calculator

Now that I'm a night photography "Newbie" I have to assemble some new tools to properly research when and where I am going to shoot. A new dimension that doesn't exist in day photography is the moon.
  • What time does it rise?
  • Which direction will it be in?
  • What altitude will it be?
  • What phase will it be (crescent, half, full etc.)
I'm sure that the moon will dramatically impact the quality of my night shots. I have come across a pretty cool calculator for both sun and moon. Check out Jeff Conrad's Sun and Moon calculator.

Now Jeff is obviously a minimilast judging by the user interface in his web page, but his calculator rocks!!! It's not the most inuitive interface, but read the tutorial and you'll quickly get the hang of it.

My favorite feature.... I love the way I can dial in a set of conditions and it will show me the dates and times that these conditions exist. For example I can say to the calculator "Show me all dates and times in the next 3 months where a crescent moon will be between 30 degrees and 40 degrees high in the East 1 hour after sunset." Like magic, if those conditions are possible, the dates and times will be listed.

In my book... thats a very handy and very cool calculator. Thanks Jeff Conrad.

Tuesday, February 12, 2008

My Geeky Analysis of Noise and Night Photography

OK, If you are the creative type looking for some creative tips... skip this blog entry. If you like the technical aspects of photography, then you might find this interesting.
Warning.. this is pretty nerdy stuff.


After my first outing of night photography I was pretty happy with the results but concerned about the noise levels I was seeing in my captures. So I wanted to get a clear understanding of how noise impacts night photography. The specific questions I wanted to answer were...
  • Does noise increase with exposure time?
  • Is there a point where it increases dramatically?
  • Does the Long Exposure Noise Reduction help a lot here?
  • How bad is the noise really?

At first I was going to do a subjective evaluation of some test shots, and then as I started hunting around for a suitable test chart to shoot, I came across an ISO Standard test chart for evaluating noise (for the geeks it's called ISO15739).


I thought this looked promising, and then I came across a free plug-in for Photoshop that automatically performed the noise measurements from the standard test chart.

Click on any of the images to see the full-size image

Well that was pretty cool... all of a sudden my qualitative measurements could now become quantitative. Now if there are any ISO standards people out there who are going to have a go at me for my lack of controls blah blah blah.. for the record... I don't give a rats! It's good enough for me so don't waste your breath.

Doing a first pass to get used to it - The impact of ISO on Noise.
I thought I would start with something simple to get the hang of the process, so I shot a series of test shots of the chart at different ISO ratings. From 100 - 3200 with my D200. Here's the results of that test.

Nothing overly surprising to me... Just so you understand the chart, across the bottom (x-axis), it shows you the different luminance levels (there were 12 patches on the chart), so you can see the shadows on the left and the highlights on the right. The Y axis is the average noise that was read by the tool (I averaged the horizontal noise readings and the vertical noise readings to create one AVERAGE noise reading for each patch). It was interesting to see how the noise really goes out of control over ISO 400, and how @ ISO100 and ISO200 the noise is for all intensive purposes the same.

Test2 - Impact of Exposure time on Noise
Next test was to understand two things... the impact of exposure time on noise and also whether the Long Exposure Noise Reduction does much (except piss me off when I'm taking the photos and waiting for it to process). I took 2 exposures at 15sec, 30sec, 1min, 2min, 4min & 8min. One exposure with NR on, and one exposure with NR off. Now this wasn't a totally controlled environment (the sun was setting and light was changing, but I tried to get the histograms roughtly the same for each set. Here's the results.


I didn't graph all the results because the graph would be too confusing. The pink & yellow lines are the 15sec exposures, and the cyan and purple are the 8 min exposures. OK... so you are probably thinking "What gives" How come the 15sec exposures have more noise than the 8 min ones.... Basically that is because I exposed the 8min exposures with +1.5ev and the 15sec exposures were + 1ev.... So the 8 min exposures were "exposed to the right" of the histogram more and required less exposure boost in the RAW conversion to get the patch densities to the correct level. So two key takeouts here from this graph.
1) Exposure time doesn't appear to impact noise levels (at least up to 8min duration)
2) Long Exposure noise reduction does bugger all (it did stop a couple of red pixels, but thats it).


Test 3 - Impact of Under and Over Exposure on Noise
So I did one final test. I wanted to understand the impact of exposing to the right on noise. I shot 4 exposures at the same shutter speed - The first @ -1ev, then 0ev, then +1 ev, and finally +1.5ev. Note: Even at +1.5ev the histogram was not clipping, so this was definitely "exposing to the right" without clipping. Here's the results.


So my key learnings from two days of Geeky stuff.

  1. Super long exposures don't create noise in my D200
  2. Long Exposure Noise Reduction is not worth it (at least for exposures up to 8 min)
  3. Under exposing (even slightly will give you the biggest noise hit)

Some of you experienced guys are probably reading that thinking "No shit sherlock"! Yeah I know I know... but at least I fully understand the dynamics of noise now on my camera.

Brent

Sunday, February 10, 2008

My Journey into Night Photography Begins

OK, I have pretty much completed my last project (to shoot all the tidal pools on the Northern Beaches). Now I'm onto my next Project.... Night Photography!

Last night I went out with Haggis for a night shoot. It was a blast. Here's two of my images from the first outing.

My First Night Shot


Night Experiment number 2


Here's the key takeways from that shoot.

1) Night shooting is a hell of a lot more social. Lots of time to talk and chat while the camera is exposing.

2) Incredible possibilities with night photography and many new elements involved.
  • You have got light painting options (what sort of light source, what temperature, how often, which angles, how direct etc.)
  • The moon comes into play (how bright, what angle etc.)
  • You have the clouds and wind... how big of a cloud streak do you want
  • Ambient light
  • New technical challenges (metering in super low levels, noise issues)
  • You have composition challenges (can't see what you are shooting)
3) Need to get a grip on some new technical challenge, primarily around noise reduction and management.

Tonight I'm going to start a series of experiments to try to minimise the noise from super long exposure images. I'm going to try making some custom Noise Ninja profiles and also test out just how well the Long Exposure Noise Reduction works.

I will post my results here.

Best thing about night photography is the pace.... It can sometimes take an hour or more to get one shot right, so you might as well take a bottle of red wine and a chair, and just slow down and enjoy the evening.