Sunday, September 28, 2008

Light Painting 101

Following on from my posting about Night Photography, this posting is a basic 101 guide for photographers interested in light painting. If you haven't read the primer to night photography, read that first. You really do need to be comfortable with night photography before playing around with light painting.

What is light painting? As you would expect from the name it's basically using light to paint a photographic image. There is actually several quite distinct variations of light painting.

1) Using a light to create trails or writing in the image. Some people like to write words, or trace outlines. Essentially you are exposing the image and leaving trails by moving the light source around in the frame. If you want to see an example of this, check out this link

2) Coloured strobes.
There are some incredible photographers who paint with coloured light. Essentially firing strobes with coloured gels on them to illuminate a scene in puddles of coloured light. Click here to see a good example of this technique.

3) Painting the landscape with more natural light.
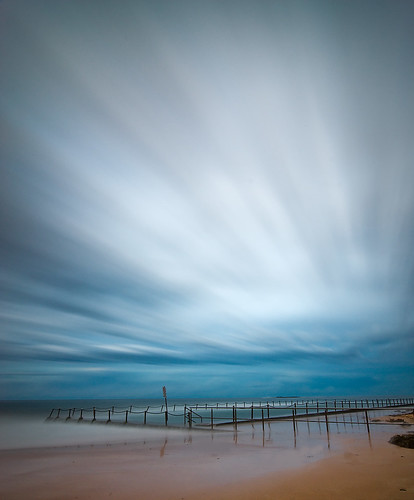
This is the type of light painting that personally interests me. Essentially you are using light sources to paint parts of the landscape with man-made light. Here's an example of one of my recent images that involve light painting.


The image involved shooting a background image of the rocks and then blending in individual images of each of the rocks that were illuminated by different light sources.

So what sort of light sources should you use for light painting? Thats where the fun begins. Each light source has different qualities.... colour temperature, harshness, intensity etc.

I'm not going to spoil your fun by telling you what I use... because there is no right or wrong answer.... half the fun of light painting is thinking about what light sources you have and experimening with them... studying their qualities and working out what you like and don't like about each source. Doesn't matter whether it is a torch or a strobe..... I suggest you get ou there... lock your camera open and just start experimenting in your back yard to learn about the light sources before you get out on location.

If you have done some experimentation and want some advice, drop me an email and I'll be happy to look at what you are doing and providing some pointers if required.... but I'm not going to short circuit the experimentation process for you by telling you what light sources I use. I have been experimenting for about 3 months with different light sources.

I have built two light painting rigs and I'm just about to build a 3rd one. Each time I build one I learn a lot about what I need in a light painting source. Get out there and have some fun and see what you can paint.

Brent

2)

Wednesday, September 24, 2008

Night Photography 101

Night Experiments continue

Recently after some of my light painting episodes I have had a few people contact me about night photography and light painting. So I thought I would do a primer on night photography first to help get people into it, and then follow it up with some advice on light painting.

First of all.... Night photography is technically a lot more challenging than shooting during the day for a number of reasons;
1) Hard to focus at night
2) Hard to compose your shot at night
3) Your light meter is useless
4) You can run into some white balance issues.
5) Hard to see your camera controls

So, if you aren't taking pretty good shots during the day, then I would advise that you focus on improving your basic photography during daylight hours first (composition, exposure, understanding your camer etc.)

Cute Pool at night in BW

However if you feel you are ready for photographing at night, then this should help you get started.

What You Need For Night Photography
  • Tripod - Essential
  • Remote shutter release cable - without this you won't be able to take exposures beyond 30sec.
  • Headlamp torch
  • Powerful pocket torch (I like the surefire torches... small, bright and the colour temperature is somewhere around 5000K
  • Pocket exposure guide - See my blog posting on calculating night exposures
Ready to go?
First thing I would recommend reading is all of the blog postings I made in Feb 08 (they all chronicle my exploration of night photography).

Picking a good night.
I would start by choosing a night that has
1) A full moon (or somewhere closer to a full moon)
2) Some clouds in the sky

Arrive before sunset. This allows you to scout your location, setup for your first location, get your composition and focus just right and relax. Start taking a few shots and watch the exposures start to get longer and longer as dusk approaches.

Focusing in the dark
To focus I set my lens to manual, shine a bright torch at a point in the image I want to focus on and do my best to set the focus manually... live view is useless and Autofocus is more than likely not going to cut it unless the focal point is close to the camera on and you have some sort of AF assist going on.

Flip over to manual exposure mode. Your light meter won't work in low-light, so you are going to have to shoot on a manual setting.

I would recommend starting on f5.6 aperture. To work out the correct exposure, I recommend you crank up your cameras ISO to either 1600 or 3200 and start with a 30sec exposure. Check your histogram and then adjust your shutter time to get an appropriate exposure (if you don't know how to read a histogram, do some research so that you understand it... it is critical).

Once you have established a correct exposure and checked composition and focus at high ISO, you need to crank back your ISO to something that will give you images with low noise. This will depend upon your camera, but with night photography it is all about long long long shutter times, so even if your camera can handle super high ISO settings with low noise (like my D700), it is still worth dropping it back to something like 200ISO.

You will need to double your shutter duration for each time you halve the ISO. Here's an example....
Lets say you crank up your ISO and determine the exposure is fine when you are shooting at
3200 ISO @ 30sec @ f5.6

When you drop your ISO to 200, you have reduced your exposure by 4 stops
3200 to 1600 = 1 stop
1600 to 800 = 2 stops
800 to 400 = 3 stops
400 to 200 = 4 stops.

So to compensate you will need to increase your shutter speed by 4 stops
30 sec to 1min = 1 stop
1min to 2min = 2 stops
2min to 4min = 3 stops
4min to 8min = 4 stops.

So the correct exposure would be 8min @ ISO 200 @ f5.6

Seen Better Days

Set your camera shutter to bulb, and get your stop watch ready.

Lock your cable release open, and then pour yourself a glass of nice wine, grab some chips or biscuits and sit back, watch the stars and enjoy the evening. One of the joys of night photography is the pace... long exposures mean plenty of time to relax, slow down, talk to other photographers, or just relax. Don't expect to come back with cards full of great images, be happy with one or two from an evening of night photography.

I'll do a primer on Light Painting shortly.

Enjoy.... I'd love to hear your feedback.

Brent

Sunday, September 14, 2008

Light Painting Forresters Rocks

This is a shot that I have been planning for about 6 weeks. I have been doing a lot of research and experimentation on light painting sources.... bought some, made some.... All the while I had a very clear first image in my mind... the gorgeous rocks at Forresters by moonlight.


I had thought about the final image for weeks... literally. I had planned the shot in a fair bit of detail and could have sketched the finished image weeks before I photographed it.

While there was still a fair bit of experimentation with light sources and exposures on the night, there was no doubt about the end result. I was pretty happy with the way that it turned out.

Incidentally, for those that want to understand what this scene looks like without the light painting and post processing... Here's one of my RAW captures straight out of the camera... this should give you an appreciation for the power of light painting when it comes to night photography.

Brent